Replaced Rudder Bearing and Thrust Washer
During the pre-purchase survey we had noticed that the rudder didn't turn as easily as it should have. Despite his bad back -Peter crawled into the lazarette to take a closer look at the steering mechanism while I turned the wheel thru its range of motion. The original thought was that maybe there was something binding in there that just needed to be worked out. Unfortunately that was not the case. What we found was a small mound of fine dust near the rudder tube - fiberglass dust. The radial drive wheel (RDW) was resting upon the fiberglass tube which housed the rudder post - it was literally grinding it into dust with every turn of the wheel. The thrust washers (2 of which go between the RDW and the top of the tube) had been completely ground down and were no longer protecting the tube. How long this had been that way was unknown and undoubtedly the effect would be less pronounced when she was afloat (thereby reducing the force on the tube) but this could not be left this way.
Armed with a somewhat serious "deficiency" I was able to negotiate a fair allowance from the purchase price to address this issue and the deal was done. The plan of attack would be to remove the radial drive wheel, drop the rudder, replace the thrust washers and while i was at it, replace the 3 rudder bearings, then reassemble. Once I had the parts in place (purchased from D&R)
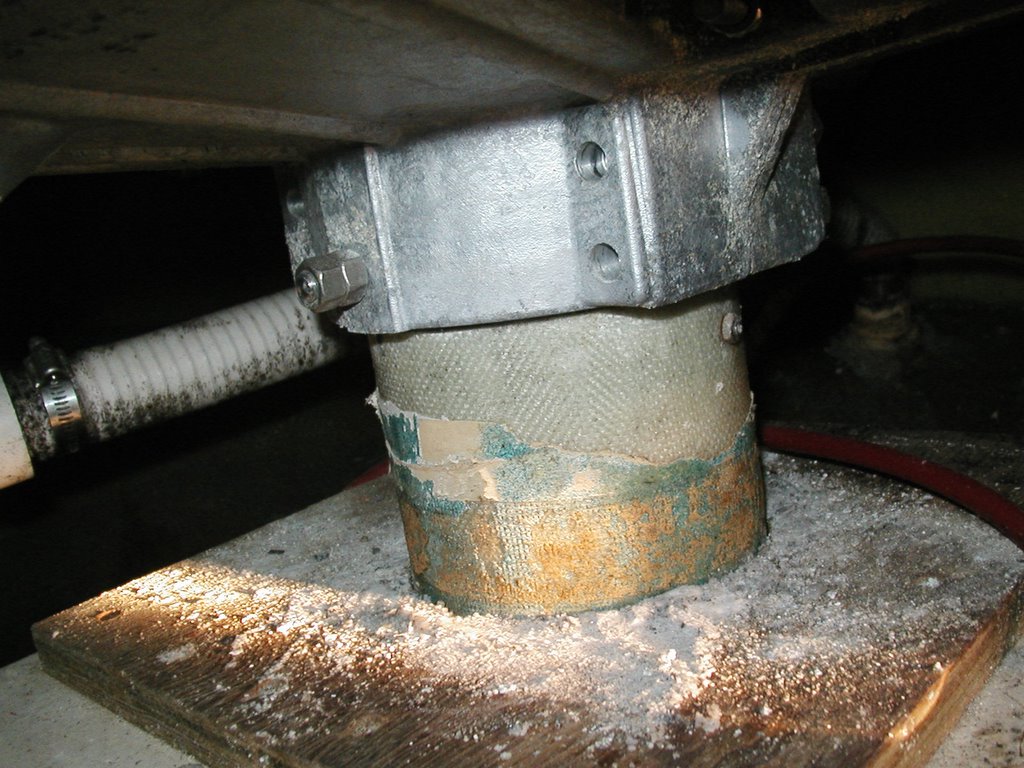
|
| Original Radial Drive Wheel showing fiberglass dust from grinding against rudder tube. |
I should have known things would get progressively worse when I hit the first roadblock on my plan. Having dropped the rudder on my Pearson 30 previously I knew that I'd need a good sized hole immediately below the rudder. It needed to be deep enough to drop the rudder and get the post all the way out of the hull. So - as part of my prep work, I dug a nice hole below the boat and rigged up a jack so that I could raise and lower the rudder in a controlled fashion.
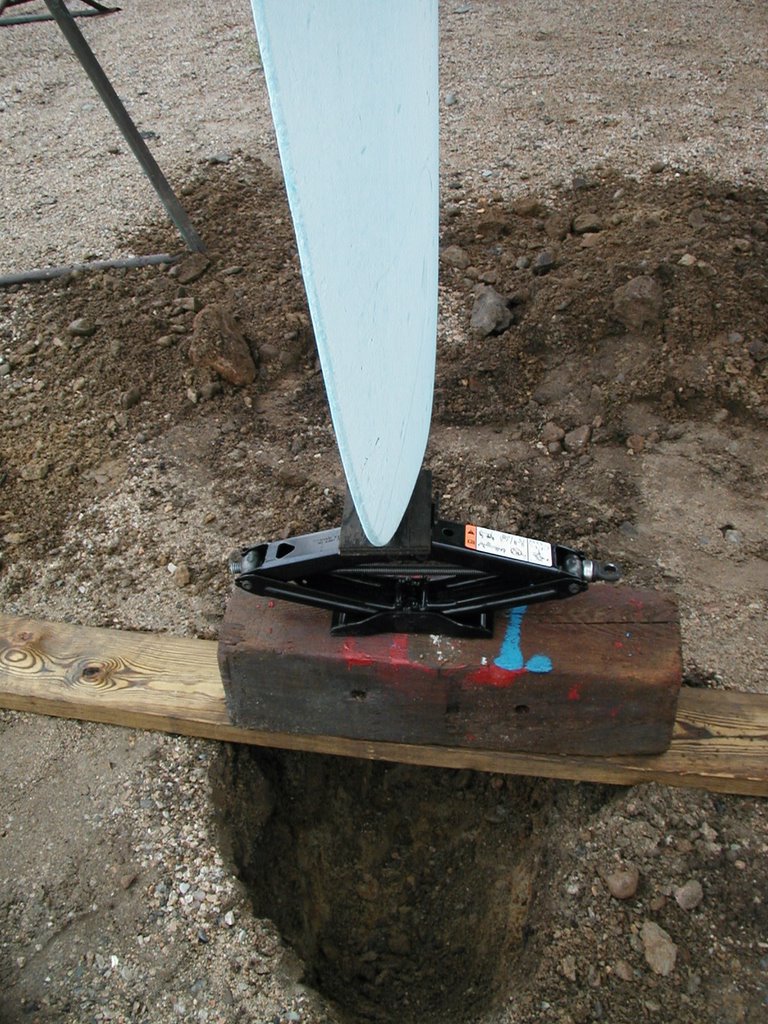 |
| The "illicit" hole with car jack to take weight of rudder off the bearings and fastners |
Monday morning - bright and early - my cell phone rings and it's the yard manager. My hole is in violation of the yard rules and I either have to fill in the hole myself today- or the yard wil ldo it for a charge of $75.00. I will not pay $75 for someone to push a pile of dirt 12" so I dropped everything and drove an hour each way to the yard and back. This was a bad omen...
D-Day finally arrives and Im determined to get the rudder out of the boat. I arrive bright and early on a cold and wet May day. Despite the yard rules, I re-dig my hole and cover the opening with a board. I then jack up the rudder about 1/2" and I climb into the lazarette and get to work. First the cables come off. I start to work on the RDW - there are 4 bolts securing the RDW around the post, 1 bolt thru the rudder post and 2 bolts along the circumference of the RDW. The outter bolts come off easily. The bolt through the center of the shaft comes out with some persuasion. The 4 main bolts are another story. These bolts are threaded into the opposing side of the RDW - there are no nuts. The body of the RDW is made of aluminum. The four stainless bolts have had 20 years to fuse themselves to the aluminum and now there's no moving them. For two days I try everything I can think of the get them out. I started with a rachet and extend the handle to get additonal leverage - no dice. I purchased every known anti-siezing chemical compound known to man - nada. I cook the $^%& out of it with a torch - nothing.
Sunday night - The rudder's still in the boat. I've got the boat scheduled to be hauled home on thursday and Im no closer to my goal. Scramble time - I get a recommendation from the yard of someone who can handle it for me and make the call. I beg and plead my case and they agree to do it on tuesday. I get the call Tuesday mid-day that they can't get it off and want permission to cut it off. Go ahead I say and I order a new RDW from Edson Marine that same day. Two days and over a dozen blades later, the RDW is off and the rudder is out of the boat.
When the boat arrived by truck in East Greenwich on Thursday afternoon we got her blocked up and I got to work. The folks who did the work for me up in MA - had reassembled the rudder but had not done it properly. They only installed one of the two thrust washers and two of the three bearings. So - out comes the shovel and I've got to dig another hole. With the RDW out of the way things go much more smoothly this time.
- Drop rudder
- Install bushings (2 in lower tube, 1 in upper tube) - In the lower tube secure bottom bushing to the fiberglass tube using 3M-5500. Upper bushing is bolted to tube. Be sure to countersink the head of the bolt so that it does not score the shaft. Bushing in upper tube is screwed from the inside of the bushing thru to the decking. Again countersink the head.
- Raise the rudder until the post is just coming in above the lower tube. To raise and lower the rudder I found two methods that worked. One was to use the jack as pictured above. The second was to out a line down into the rudder post and around the pin that is used for the emergency tiller. This method allowed me to raise it while on the boat (without having to climb down).
- Put both thrust washers on the shaft (if you use the rope method above (you need to put the rope thru the thrust washers first).
- Raise the rudder the rest of the way - into the top bushing
- Install RDW on rudder post - The RDW comes with one hole for the thru bolt already drilled. You will drill the second hole later. Align the hole in the shaft with the hole in the RDW. Be sure to put anti-corrosive tape (looks like yellow tape) between the aluminum RDW and the Stainless shaft so that there is no electrolysis. Tighten the 4 bolts to compress the rdw around the shaft. Once you've got a good fit - drill thru the shaft and out the other side of the RDW. Install the thru bolt.
- Install stop on top of RDW (prevents rudder from turning beyond maximum)
- Installed new chain and wire and lubricated shivs.
posted by nichenet @ 3:30 PM
0 comments
![]()

0 Comments:
Post a Comment
<< Home